
Floor plan guide

How to measure a room for a floor plan

To measure a room for a floor plan, sketch its outline first, then go around it clockwise with a tape or laser, writing each wall's length and where every door and window starts and ends. Measure both diagonals to check the corners are square, add the ceiling height, and multiply length by width for the floor area.

  • 7 steps, one tape
  • A diagonal check for square corners
  • Printable measuring sheet

This page is part of our floor plan guide. For what the finished drawing shows, start with what is a floor plan

What do you need to measure a room?

A steel tape, a pencil and graph paper will do the whole job. A helper halves the time and most of the mistakes: one person reads, the other writes and repeats each number back.

ToolGood forWatch out for
Steel tape measure, 25 ft (8 m)Every wall, door and window. The default.Sags on a long wall unless someone holds the far end. Where it backs into a corner, butt the case against the wall and add the length of the case, which many tapes print on the side.
Laser distance measureLong walls, diagonals and ceiling heights, on your own.Needs a solid surface to hit. Hold it level, with its base flat against the wall. Typical models are rated to about ±1/16 in (1.5 mm).
Phone measuring appA quick first size, or checking a gap.Small errors add up along a long wall, and tracking suffers facing a blank wall or in dim light. Check the longest wall with a tape before trusting the rest.
Graph paper and a pencilThe sketch that every number is written on.Use pencil: the sketch changes as you find things you missed.

How do you measure a room for a floor plan?

Work around the room clockwise and read every number off the same tape. The sketch shows the finished floor plan measurements for a 12 ft 6 in by 15 ft bedroom.

  1. 1

    Sketch the room and letter the walls

    Draw the outline freehand, large enough to write on, with every door, window, radiator and built-in where it sits. Letter the walls A, B, C and D clockwise, starting with the door wall. It doesn't need to be to scale: the numbers do that.

  2. 2

    Measure each wall, corner to corner

    Face the wall and run the tape from its left-hand corner to its right-hand corner, along the top of the baseboard rather than the floor. Write the length outside the sketch, then move on to the next wall on your right.

  3. 3

    Read every opening off the same tape

    Keep the tape anchored in the left-hand corner and read each edge as you pass it: where the door frame starts and ends, the window frame, the radiator. With everything measured from one zero, one misread doesn't shift the rest, and the last reading must match the wall length.

  4. 4

    Mark door swings, outlets and vents

    Draw each door's swing on the sketch: the side its hinges are on, and whether it opens into the room or out of it. Mark outlets, switches, the thermostat and heating or cooling vents too: they decide where a bed or a desk can go. If a window sill is low enough for furniture to sit under, note its height.

  5. 5

    Measure both diagonals

    Measure corner to corner across the room, both ways. In a square room the two match; in the example both are 19 ft 6¼ in. If yours differ by more than about ½ in (1 cm), read the square check below before you draw.

  6. 6

    Measure the ceiling height

    Measure from floor to ceiling in two places. For a sloping ceiling, note the lowest and the highest point, and mark any beam or bulkhead on the sketch.

  7. 7

    Measure the walls between rooms

    If you are measuring more than one room, measure each wall's thickness across a door frame. A North American interior stud wall is about 4½ in (115 mm). Leave it out and the rooms won't add up to the outside of the house.

02′ 0″4′ 10″12′ 6″015′ 0″03′ 9″8′ 9″12′ 6″015′ 0″ABCD19′ 6¼″19′ 6¼″
Each wall has one line of readings starting from the solid dot in its left-hand corner, the door and window frame edges are read off the same tape, and both diagonals measure 19 ft 6¼ in.

Where exactly do you measure from?

Most measuring mistakes come from measuring to the wrong surface, not from misreading the tape. Measure the room itself, not the trim fixed to it.

2′ 10″not to the trim4½″
Measure the opening between the frame, 2 ft 10 in here, not across the trim. The wall's thickness, 4½ in, is taken across the frame.
MeasuringMeasure toNot to
A wallThe wall surface at each corner, along the top of the baseboardThe baseboard itself, which shortens the wall by its thickness at both ends
A doorThe inside edges of the frame, jamb to jambThe outside edges of the trim around it
A windowThe edges of the frameThe trim, the sill or the curtain rod
Ceiling heightThe finished floor and the ceiling surfaceA beam or a light fixture, unless you note it separately
Wall thicknessOne wall surface to the other, across the door frameAcross the trim, which sticks out from the wall on both sides

How doors, windows and their swings are then drawn on a plan is set out in floor plan symbols

How do you measure an L-shaped or irregular room?

Measure every wall in order, exactly as for a rectangular room: an L-shaped room simply has six walls instead of four. For the floor area, split it into rectangles.

18′ 0″9′ 0″7′ 0″5′ 0″11′ 0″14′ 0″18′ × 9′ = 162 sq ft11′ × 5′ = 55 sq ft
An 18 by 14 ft room with a 7 by 5 ft corner missing, split along the dashed line into an 18 by 9 ft rectangle and an 11 by 5 ft rectangle.
  • Check that the wall runs add up

    In a room with square corners, the walls facing one way add up to the walls facing the other. Here the 18 ft wall equals the 11 ft and 7 ft walls opposite it, and the 14 ft wall equals the 9 ft and 5 ft walls. If they don't add up, a number is wrong.

  • Measure recesses as rectangles of their own

    A closet, a bay or the nook beside a fireplace is a small room in itself: measure its width and depth, and note where its opening sits along the main wall.

  • Angled and curved walls

    Measure an angled wall's length and locate both of its ends from the nearest corners. For a curved bay, measure the width of the opening and how far the curve projects at its centre.

How do you work out a room's square footage?

The square footage of a room is its length multiplied by its width, both in feet. For an L-shaped room, add up its rectangles; subtracting the missing corner from the full rectangle gives the same answer, which makes a handy check.

Turn inches into decimal feet first by dividing by 12: 12 ft 6 in is 12.5 ft, not 12.6 ft, and 6 ft 9 in is 6.75 ft.

RoomWorkingSquare feetSquare metres
A 12 by 12 ft room12 × 1214413.4
A 10 by 12 ft room10 × 1212011.1
A 20 by 20 ft room20 × 2040037.2
The example bedroom12.5 × 15187.517.4
The L-shaped room, in rectangles18 × 9 + 11 × 521720.2
The L-shaped room, by subtraction18 × 14 − 7 × 521720.2

Buying flooring? Work from the larger reading of each wall and add the waste allowance your supplier recommends, commonly 5 to 15 percent. That allowance is for the order, never for the plan.

How do you check that a room is square?

Measure both diagonals. A room whose opposite walls match and whose diagonals match is a rectangle, so you can draw it with square corners. Few rooms are perfect, so the real question is whether the difference is bigger than your measuring error.

What you measureWhat it meansHow to draw it
Opposite walls match, and the diagonals are within ½ in (1 cm)The room is square. Treat a difference this small as measuring error rather than a crooked room.With square corners
Opposite walls match, but the diagonals differ by moreThe room is skewed: every corner is out of square by the same amount. In a room up to about 1½ times as long as it is wide, each wall's far end is out by less than the diagonals differ; in a longer, narrower room, the long walls can be out by more.Square for a furniture layout; with the real angle where cabinets, countertops or flooring run along those walls
Opposite walls don't matchAt least one wall isn't parallel to the wall across from it.From triangles: two walls that meet at a corner, plus the diagonal between their far ends, fix that corner
19′ 7″19′ 5½″1⅛″ out
The lean is exaggerated so it shows. The dashed outline is where square walls would be; the readings are the real ones, 19 ft 7 in and 19 ft 5½ in.

Worked example

The same 12 ft 6 in by 15 ft bedroom, but the diagonals read 19 ft 5½ in and 19 ft 7 in: 1½ in apart. Worked through, the far end of each 15 ft wall is about 1⅛ in out of square, and the far end of each 12 ft 6 in wall about 1 in. A bed won't notice. A run of wall cabinets will. The longer diagonal runs between the two corners that are tighter than 90°.

Checking one corner: the 3-4-5 rule

Mark 3 ft along one wall from the corner and 4 ft along the other. If the corner is square, the two marks are exactly 5 ft apart. Double it to 6, 8 and 10 ft for a more reliable check, or use 60, 80 and 100 cm.

How many diagonals an odd-shaped room needs

Wall lengths alone don't fix a room's shape: the same four walls can lean. Each diagonal closes off a triangle, and three sides fix a triangle, so a room with n walls needs n − 3 diagonals: 1 for a four-walled room, 3 for an L-shaped one. Measure one more as a check.

How precise do room measurements need to be?

It depends on what they are for, and so does which number you write down when a wall measures differently at each end.

Measuring forRound toIf a wall reads differently at each end
A floor plan or layout sketch¼ in (5 mm)Write both. Draw the average, or the angle if they differ by more than ½ in
Furniture that has to fit¼ in (5 mm)Use the smaller reading: the tightest point decides whether it fits
Flooring, tiles or paint½ in (1 cm)Use the larger reading, then add your supplier's waste allowance
Built-in cabinets or countertops1/16 in (2 mm)Record both ends and both diagonals. The installer will measure again, but needs to know the wall is out
A home's square footage (US)1 in, or a tenth of a footMeasure the outside of the exterior walls, as the ANSI Z765 standard used by appraisers does

Is there a printable room measuring sheet?

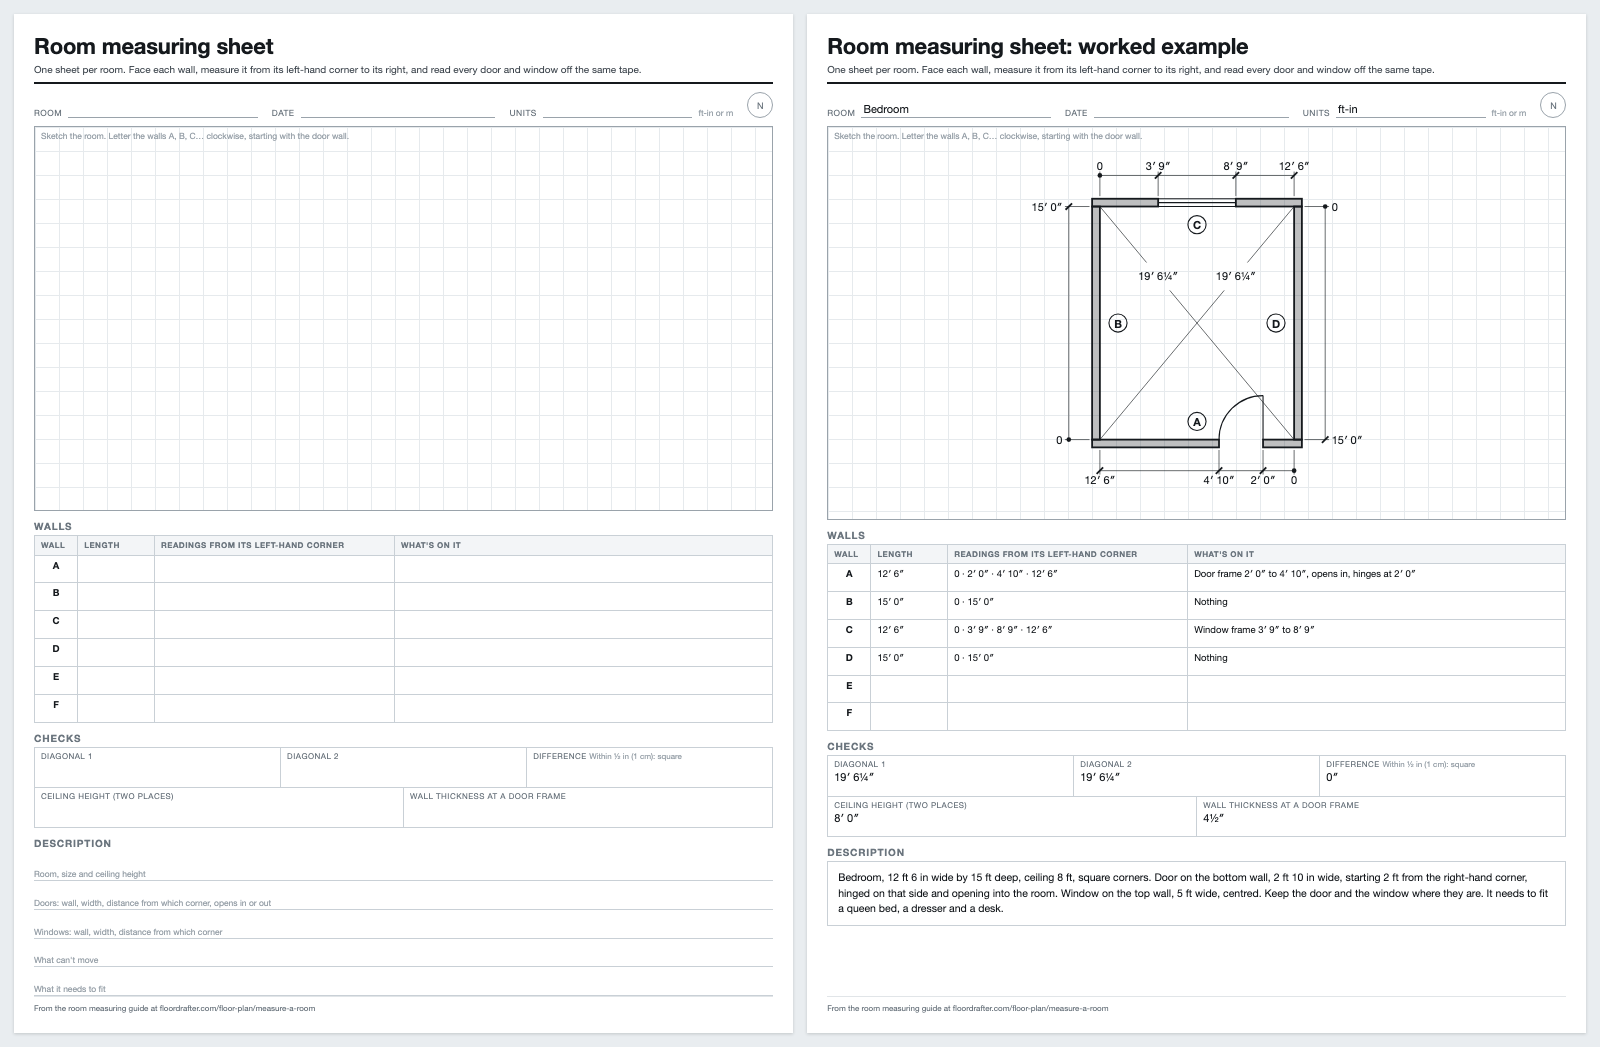
Yes. Two pages: a blank sheet with a grid sketch area, a table for the walls, boxes for the checks and a description to fill in, and the same sheet filled in for the bedroom used throughout this guide.

  • A grid sketch area with a place for each wall letter
  • A wall table for lengths and the readings along each wall
  • Boxes for both diagonals, the ceiling height and wall thickness
  • A fill-in description in the order this guide recommends
  • Sized to print on US Letter or A4
Download the sheet (PDF)

Print one sheet per room, and photograph each finished sheet before you leave the room.

Room measuring sheet: a blank page with a sketch grid, a wall table and a description to fill in, beside the same page completed for a 12 ft 6 in by 15 ft bedroom

Measuring a room: questions people ask

Short answers to the questions that come up most.

With a steel tape and a helper. Sketch the room first, then have one person hold the tape in each corner while the other reads along the wall and writes each number on the sketch, repeating it back. A laser measure makes long walls and ceiling heights a one-person job, and a phone app is fine for a rough first size.

There is no fixed rule. Floor plans usually give a room's size as width first, then depth, as you face into the room from its door, but not every drawing does. When you write down your own room measurements, name the wall each figure runs along, such as door wall 12 ft 6 in, and the question stops mattering. For a door or a window, the width comes first, then the height.

144 square feet, or 13.4 square metres: multiply the two sides, 12 × 12 = 144. When a side isn't a whole number of feet, convert the inches to a decimal first. A room 12 ft 6 in by 12 ft is 12.5 × 12 = 150 square feet, not 12.6 × 12.

For a rough size, yes. Measuring apps work out distance from the camera, and phones with a LiDAR sensor measure depth directly, which helps. Small errors add up along a long wall, and tracking suffers when the camera faces a blank wall or the room is dark. Measure the longest wall with a tape as well, and trust the phone only if the two agree.

No. A photo has no reliable scale, and perspective shortens everything that runs away from the camera, so the same wall measures differently in every shot. Take the measurements in the room itself. A photo is still worth having as a record of where the outlets, switches and radiators are.

From the wall. Run the tape along the top of the baseboard so it reaches the wall surface at both ends. Measured along the floor, the baseboards shorten the wall by their thickness at each end, commonly about ½ in each, which is enough to make furniture that fits on paper miss.

Measure every wall and both diagonals. If the diagonals differ by more than about ½ in (1 cm), the room is out of square. To draw it, use triangles: two walls that meet at a corner, plus the diagonal between their far ends, fix that corner.

Inside: a room's size runs from one wall surface to the other. A whole house is different. In the US, appraisers follow the ANSI Z765 standard, which measures a detached house to the outside of its exterior walls, so your rooms added together will come to less than the home's official square footage.

How do you write down room measurements for a floor plan?

Write the numbers down wall by wall, in a fixed order: the room's size, then each wall and what is on it, then what can't move. A designer, a contractor or an AI generator reads the same notes the same way.

The notes, wall by wall

WallLengthReadings from its left-hand cornerWhat's on it
A12′ 6″0 · 2′ 0″ · 4′ 10″ · 12′ 6″Door frame 2′ 0″ to 4′ 10″, opens in, hinges at 2′ 0″
B15′ 0″0 · 15′ 0″Nothing
C12′ 6″0 · 3′ 9″ · 8′ 9″ · 12′ 6″Window frame 3′ 9″ to 8′ 9″
D15′ 0″0 · 15′ 0″Nothing
Diagonals19′ 6¼″ and 19′ 6¼″: square
Ceiling8′ 0″

The same notes as a description

Bedroom, 12 ft 6 in wide by 15 ft deep, ceiling 8 ft, square corners. Door on the bottom wall, 2 ft 10 in wide, starting 2 ft from the right-hand corner, hinged on that side and opening into the room. Window on the top wall, 5 ft wide, centred. Keep the door and the window where they are. It needs to fit a queen bed, a dresser and a desk.

Five rules that keep a description drawable

  1. 01

    Name the walls, not the dimensions

    Length and width get swapped between the person measuring and the person drawing. Say which wall a figure runs along: by compass direction if you know where north is, otherwise top, right, bottom and left as your sketch is drawn.

  2. 02

    Put every opening on a wall

    For each door and window, give the wall, the width and how far it starts from a named corner, and for doors which way they open. Sizes set the proportions; the openings decide where the furniture can go.

  3. 03

    Use one unit system

    Feet and inches or metres, not both. Mixed units are the quickest way to get a drawing that is scaled to neither.

  4. 04

    Say what can't move

    The door, a window, a radiator, a plumbing stack, a fireplace. Anything you don't pin down is open to a different layout.

  5. 05

    For a whole floor, walk it

    List the rooms in the order you walk through them, say which door joins which rooms, and give the outside size of the floor if you measured it.

Type a description like this into the AI floor plan generator

Or photograph the measured sketch and use sketch to floor plan

Turn your measurements into a floor plan

Type in the room sizes and where the doors and windows are, or upload your measured sketch, and get a clean floor plan back as a PNG.